Audio CDs:
Step 1
Prepare your .MP3 or .WAV files which are the only files that can be used for an audio CD.
Audio CDs must have a total play time of 79 minutes or less.
Name your .MP3 or .WAV files with a leading two digit number (e.g. 01First-track.mp3, 02Second-track.mp3 ... 10Final-track.mp3) to make sure they play in the desired order (see below).
Step 2
Create a .zip or .rar file if your .MP3 or .WAV files.
Before we burn the Audio CD, we unzip your .MP3 or .WAV files and use them to create a true Audio CD.
The track order is determined by alphanumeric sort order so start each track name with a 2-digit number using leading zeroes (see below).
Step 3
Upload the zip file directly to the TrepStar project.
Once complete, TrepStar approves the project and then you are able to order.
Step 1: Set play order and name your files properly:
If you have the WAV or MP3 files, it's time to create a folder on your computer for each CD you plan to make. Place the MP3 or WAV files in that folder. WAV files must be 16 bit, 1411 kbps only (see WAV file format section below).
File Names:
Use ENGLISH letters and numbers ONLY in your file names: Using characters other than English letters (A-Z) and numbers (0-9) will create an invalid file name that will cause the burn to fail and you'll have to redo your zip file with proper file names and update your project again before the burn will succeed.- Good: "01 My First Track.wav" - English letters and numbers only in the file name.
- Bad: "01 NÒt GòöĐ ~This will FAIL.wav" - Contains some non English letters.
Set the Play Order:
Track order is determined by the alphanumeric sorting of the file names. To ensure your tracks are played in the order you want, edit your file names and add a two digit number at the start of each of your .mp3 or .wav file names. For example:- 01 The first track.mp3
- 02 Second track.mp3
- ...
- 09 Ninth song.wav
- 10 Tenth track.wav
- ...
- 99 Ninety ninth track.wav
If you do not use leading zeroes, alphanumerically, 10TheTenthSong.WAV will sort BEFORE 9NinthTrack.WAV! because 1 is less than 9! This is probably not what you wanted but WILL be the way it's burned.
We use computers to unzip and burn files so we need a standard way of ordering the tracks. The TrepStar system does not download or check your files before (or after) an order is placed, nor can it guess at your desired order of the tracks. This is why we created a standard way of burning your tracks in "file name alphanumeric order". This way, all publishers can have an explicit way to set the track play order (by starting the name of each file with a 2 digit number 01, 02... etc).
If you wish, before you order your first music CD, contact us by email and we can download your zip, look over your file names and confirm you have them listed the correct way you expect. There is a $15 fee (per disc) to confirm your track order. We will email and/or call you by phone as part of this service. If you do not use this service and you did not order your tracks correctly by our standard (alphanumerically) you will need to redo your file names, zip file and order again.
WAV file format:
Audio Sample Rate: 16bit
Channels: 2 (stereo)
Frequency: 44 khz (44100hz)
Bit Rate: 1411 kbps
MP3 file format:
It's important to know that our system accepts .MP3 files that have been extracted in the following format only:
Audio Sample Rate: 16bit
Channels: 1 or 2 (stereo or mono)
Frequency: 44 khz (44100hz)
Bit Rate: (you may choose). We recommend a bit rate of 192 kbps or higher for optimal audio quality.
Maximum Play time for Audio CDs:
- There is no limit to the number of tracks. HOWEVER, total play time must be 79 minutes or less.
- If your recordings are more minutes than 79 minutes, either break them down into multiple disc sets or modify your project and make it a Data CD. A Data CD is not limited by total play time. It's limited by file size only. For example, a Data CD of .MP3 files can play for hours in a computer, some car CD players, some game systems and some bluray or DVD players. The drawback is that a data CD is not going to play in an older CD player. A Data CD of MP3 or WAV files can easily be imported into iTunes from your computer for example.
Burn Errors: Once you order, our automated system tries to burn your audio CD and at this point, there may be errors:
- 'insufficient space' error. We'll have to inactivate the project and you'll have to edit down and shorten the play time of your files, or add a 2nd disc to the set (split it up into another disc). This means the total length of play time is too long (over 79 minutes).
- 'invalid files' error. This occurs if you've used non English letters and numbers in the file name or you have included wav files with a bit rate of over 1411 kbps. We'll inactivate the project until you fix the problem, and upload a new .zip file.
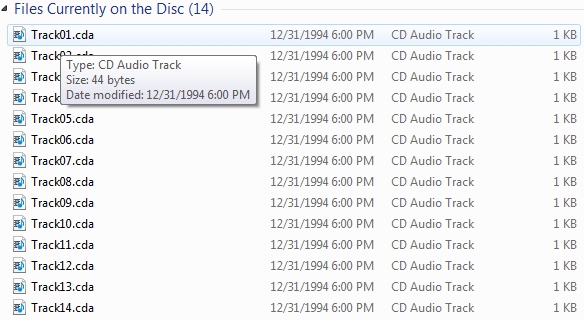 For true Audio CDs, the original names of your files are not crucial.
When an audio CD is made, the files are renamed as Track01.CDa, Track02.CDa ... If you look at the image, you can see the information a computer will see when an Audio CD is loaded. It does not matter what you've named your .MP3 or .WAV file. Once the Audio CD is made, the file names change.
However, some CD Text data is stored on the Audio CD that does contain some of your file name and publisher information, but that is not important when played on a standard CD player.
Step 2: Create a .zip or .rar file:
Compress your .MP3 or .WAV files into a single .zip (or .rar) file.
If your project is a multi disc set, each disc will need a separate .zip or .rar file.
Before we burn the audio CD, we unzip the files first, and use those .MP3 or .WAV files to make the audio CD.
Not sure how to zip up files? Learn More
Step 3: Upload the file:
You have some choices on what to do with the zip or rar file when you've made it:
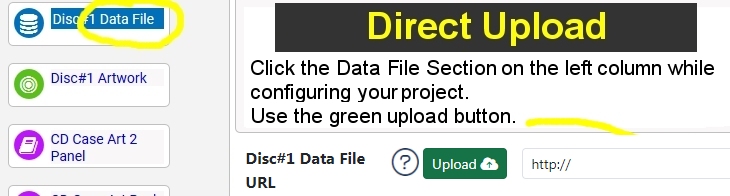 1) You may upload your file directly to the TrepStar Project. Edit your project, click the green upload button, and select your zip file.
 2) You may upload your file to your website, then edit the TrepStar project and type in the URL to that file on your server.
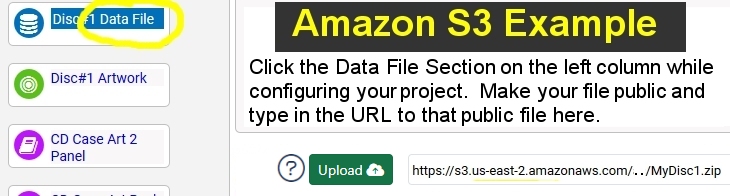 3) You may upload your file to a cloud service like Amazon S3. Make that file public, get the URL, then edit the TrepStar project and type in the URL to that file on your server.
Learn More about Amazon S3
3) You may upload your file to a cloud service like Amazon S3. Make that file public, get the URL, then edit the TrepStar project and type in the URL to that file on your server.
Learn More about Amazon S3
Too much work? Let us do the file preparation for you:
If you would rather skip the file preparation step, or want complete project setup support, you have a few options. Learn More
Other Considerations:
- With true audio CDs, the names of your WAV or MP3 files are not important and do not get saved to the disc. They are lost when burning an audio CD. You can give your files a descriptive name but that name is only stored in the CD text.
- To have iTunes and other services recognize your new music CD, You need to upload the track and CD title information to the free service at GraceNote.com. You can also add this data on your own computer through iTunes after importing your CD to iTunes. Then the titles of the tracks and the CD title will appear when the CD is uploaded on any computer to iTunes or Windows Media.
- For audio CDs, only .MP3 or .WAV are allowed. You can not have an audio CD contain .pdf files for example. That type of disc would be considered a data CD that would play in a computer and have a 700MB capacity. If that's all you need, change your project options and pick a data CD.
- You may also consider creating a DATA CD containing many MP3 files. CDs can hold about 700MB of data. A DATA CD of MP3 files could easily hold over 100 songs, but those files would need to be played in modern devices a computer, PSx, XBOX, modern CD/DVD players, modern car CD players that would recognize those formats (MP3). However, data CDs are not compatible with old CD players, or older car CD players or boomboxes. You would want to make a data CD of MP3 files if you wanted customers to use your disc in their computer, or import it into iTunes from their computer. You can store hours of audio on a data CD if it's in MP3 format since a song in MP3 format is usually about 10 times smaller in file size than a WAV file of the same length of play time. Some newer Car CD players can play data CDs that contain .MP3 files.
- The actual files you give us are converted to .CDa files. These files are created by our system when the disc is burned as an audio CD, and the source .MP3 or .WAV file is used to create these files. The total play time is just under 79 minutes but we recommend you limit your CD to 79 minutes to best most compatible with all audio CD players..